How to Draw a Site Plan in Google Sketchup
![]() Description: All the steps needed to do a basic preliminary 3D site plan are included in these videos, which are linked below at the commencement of each bullet point. The text following each link serves as a reference guide if yous demand to go back to the video. Note: To become the almost out of the videos in youtube, toggle full-screen and HD using the settings in the lower correct of the youtube screen.
Description: All the steps needed to do a basic preliminary 3D site plan are included in these videos, which are linked below at the commencement of each bullet point. The text following each link serves as a reference guide if yous demand to go back to the video. Note: To become the almost out of the videos in youtube, toggle full-screen and HD using the settings in the lower correct of the youtube screen.
Writer: Dr. Austin Troy, College of Architecture and Planning
Admission all videos in 1 playlist
Footstep ane: Getting started. Download the Sketchup free version. Open Sketchup
Step 2: Larn Imagery and location (click for video): This step uses an easy interface to grab the groundwork aerial epitome for your site and, in the procedure, requite your model existent globe location data. Note that while y'all tin can show terrain relief (which volition be slight) past clicking File>>Geolocation>>testify terrain, we recommend not using information technology now, equally it adds a whole additional layer of complexity. I will add more tutorial material later on on how to bargain with this, just for now, just endeavor viewing and go dorsum to normal flat manner. Too note that when "grabbing" your imagery from Google Earth, make the window as large equally possible to maximize the resolution of the resulting base map image.
Step 3: Navigation: You're now in 3D mode. Alter the 3D perspective either using clicking the heart mouse push (track wheel) and moving effectually the screen while the wheel push button is depressed or using the orbit button. You can zoom in and out by turning the track wheel or using the zoom tool, two over from Orbit. Pan using the hand. All this and more covered in the video
Pace iv: Add bare footing layer: You'll probably desire to add together a basis layer or pad to comprehend upwardly the part of the air photo that your site is on, bold that site is going to change. In other words, this will exist the Sail for your design. The video explains how to built that ground pad and fill it with a color or texture.
Step v: And flat features: You'll desire to populate your footing pad with features. The video explains how to create 2D, flat geometric features like a drivway, and less geometric features like a meandering path or pond.
Footstep 6: Modify terrain: Dealing with real world terrain is a more avant-garde topic, but if yous just want to add pocket-size invented terrain features, like a hill or depression, this video explains it.
Step 6.5: Draping features on terrain: This tutorial explains how to drape distributed features like roads or paths over 3D terrain, then that the features sit down "on superlative" of the underlying terrain. Annotation that this uses a different report site than the other tutorials, as those areas accept very little terrain relief
Step 7: Add small 3D objects: You'll want some 3D features, like trees and light posts, or fifty-fifty people and cars. The video explains how to utilize the component and 3D warehouse browsers to wait for smaller features to place on the landscape, like trees, how to resize them and how to rotate them. Notation that in this tutorial I bear witness how to download trees from the 3D warehouse. However, as the last video tutorial shows, the rendering plugin that I have you all download in the last footstep (Ariel Vision) has Actually nifty trees and I very much recommend using those over the trees in the 3D warehouse, which means yous should download Ariel Vision before you start working with 3d object placement.
Step 8: Add buildings and large structures: If you desire to add buildings, this video explains how to use the component and 3D warehouse browsers to look for expert buildings, add them to your model, rotate them, resize them, and eliminate superfluous elements, like the underlying pads.
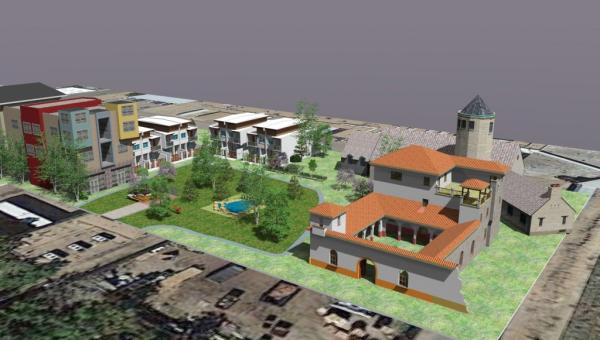
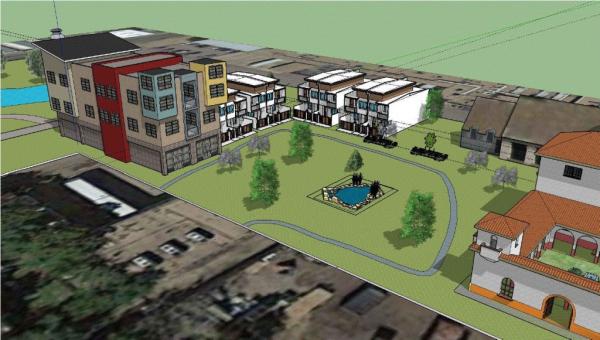
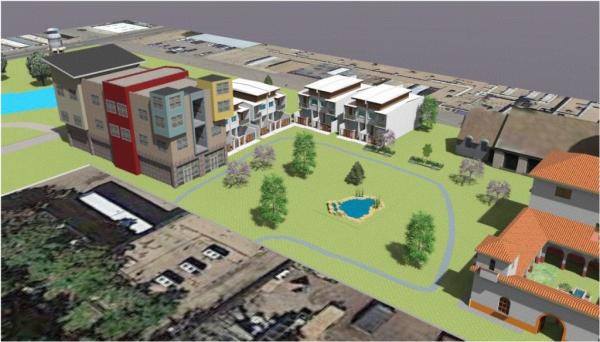
Footstep 9: Render your model: Finally, you might want to render your design to give it loftier quality visuals. Most of the rendering plugins price some money, but yous tin can download trial versions which you can use for now and will greatly improve the look of the output. The one nosotros'll download here is chosen Ariel Vision and information technology comes with a 30 twenty-four hours free trial. Ariel Vision also includes hundreds of textures and materials y'all tin apply to surfaces and a very nice library of trees, superior to nearly of the tree models on bachelor in the warehouse. This video explains the process. Below is an example of what the aforementioned scene that I designed looks like rendered (first) and not-rendered (second).
Final Non-Rendered Site Plan:
Final Rendered Site Programme:
Source: https://clas.ucdenver.edu/fast/sketchup-site-plan-tutorial
0 Response to "How to Draw a Site Plan in Google Sketchup"
Postar um comentário